
How to Measure Room for Furniture: Complete Guide 2026
Choosing furniture for your home involves much more than simply falling in love with a piece in the showroom. The journey from store to your living space requires careful planning, precise measurements, and strategic thinking about delivery logistics. Many Australian homeowners discover this the hard way when their dream sofa arrives but won’t fit through the front door, or when a perfectly sized dining table overwhelms their actual room space.
Understanding how to measure room for furniture properly can save you from costly mistakes, delivery delays, and the frustration of returns. From Federation terraces in Sydney to modern apartments in Melbourne, each Australian home presents unique challenges that require specific measurement techniques. The process involves evaluating not just your room dimensions, but also the entire delivery route, doorway clearances, and spatial relationships that will determine whether your furniture purchase becomes a design triumph or an expensive lesson.
This comprehensive guide walks you through every step of measuring your space effectively, from initial room assessment to final placement planning. Whether you’re furnishing a compact city apartment or a sprawling suburban home, these measurement strategies will help ensure your new furniture fits perfectly and enhances your living space as intended.
TL;DR: Essential Steps for Measuring Room for Furniture
Successful furniture shopping starts with measuring the delivery route before measuring the room itself. Many furniture delivery failures occur not because pieces don’t fit the final space, but because they can’t navigate doorways, hallways, or staircases along the way.
- Start with delivery route mapping: Measure from street access through every doorway, hallway, and staircase to your room
- Document all openings: Record width, height, and frame depth for doors, plus any obstacles like handles or security chains
- Measure room dimensions accurately: Take length, width, and ceiling height at multiple points to account for irregularities
- Calculate proper clearances: Allow 40-50cm between sofas and coffee tables, 90cm for dining chair pullout, and 60-90cm for walkways
- Apply the 2/3 rule: Furniture length should be roughly two-thirds the length of the wall it sits against
- Use painter’s tape for testing: Outline furniture footprints on your floor before purchasing to visualize actual space usage
- Consider Australian home specifics: Account for narrow doorways in Federation homes, elevator restrictions in apartments, and deep door frames in double-brick construction
Essential Tools and Preparation for Room Measurement
Successful room measurement for furniture begins with proper preparation and the right tools. Having everything ready before you start ensures accurate measurements and prevents costly mistakes when purchasing furniture for your Australian home.
Required Measuring Tools: Steel Tape Measure vs Fabric Tape vs Laser Measure
The foundation of accurate room measurement lies in choosing the right measuring tool. Each option offers distinct advantages depending on your specific needs and the complexity of your space.
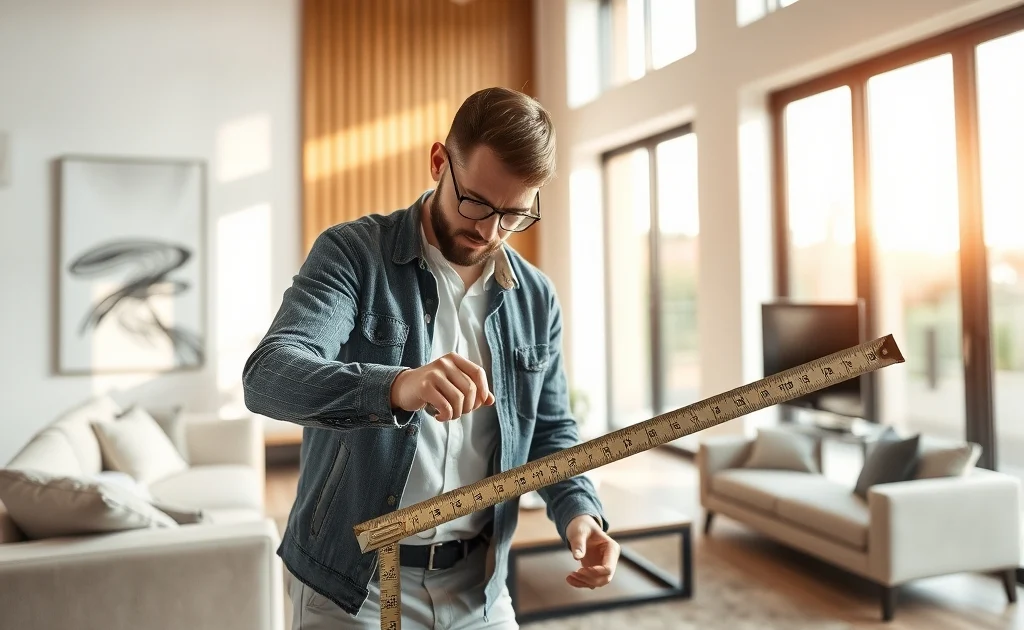
Steel tape measures remain the gold standard for most room measurements. Their rigid construction holds its shape when extended, making single-person measurements possible and providing consistent accuracy. Look for a model with at least 5 metres of length to handle most Australian room dimensions without needing to reposition.
Fabric tape measures work well for curved surfaces and furniture dimensions but can stretch over time, leading to inaccurate readings. They’re best reserved for measuring existing furniture or checking fabric requirements rather than room dimensions.
Laser measures offer the highest precision and convenience, especially for longer spans common in open-plan Australian homes. They provide digital readouts you can photograph for reference and excel at measuring ceiling heights and large wall spans. However, they require a clear line of sight and can struggle with reflective surfaces or bright sunlight.
Supporting Tools: Pencil, Paper, Smartphone Camera, Painter's Tape
Beyond your primary measuring tool, several supporting items will streamline the measurement process and improve accuracy.
Keep a dedicated notebook and pencil for recording measurements as you work. Avoid relying on phone notes, which can be cumbersome when your hands are busy with measuring tools. Graph paper helps create proportional sketches that make visualising furniture placement easier.
Your smartphone camera serves multiple purposes during measurement. Photograph each wall from multiple angles, capture your measurement sketches, and document any architectural features that might affect furniture placement. These reference photos prove invaluable when shopping for furniture weeks later.
Painter’s tape becomes essential for testing furniture footprints before purchase. Use it to outline potential furniture positions on your floor, allowing you to walk through the space and assess traffic flow. This technique prevents expensive mistakes and helps visualise how different furniture arrangements will function in daily use.
Clearing the Space: Removing Obstacles and Temporary Items
Preparing your space properly ensures accurate measurements and prevents safety hazards during the measuring process.
Remove all moveable furniture, decorative items, and temporary fixtures before beginning measurements. This includes area rugs, pot plants, floor lamps, and any furniture that can be relocated to another room. Clear pathways ensure you can move freely and extend measuring tools without obstruction.
Pay particular attention to items that might interfere with measuring tools. Ceiling fans need to be turned off to prevent interference with laser measures, while mirrors and glass surfaces can affect laser accuracy. Cover or remove these items temporarily if they’re impacting your measurements.
Document the location of permanent fixtures like built-in wardrobes, air conditioning units, and electrical outlets. These elements remain part of your room’s footprint and must be factored into furniture placement decisions.
Safety Considerations and Getting Assistance for Large Measurements
Room measurement involves working with extended measuring tools and potentially climbing to reach ceiling heights, making safety preparation essential.
Enlist a helper for measurements longer than 3 metres or when measuring ceiling heights. Two-person teams improve accuracy and reduce the risk of accidents from overreaching or balancing measuring tools awkwardly. Your assistant can hold one end of the tape measure while you record measurements, ensuring consistent tension and straight lines.
Use a sturdy step ladder rather than chairs or makeshift platforms when measuring ceiling heights or high wall features. Australian building standards typically require ceiling heights of 2.4 metres minimum, but many period homes feature higher ceilings that require proper equipment to measure safely.
Be mindful of electrical outlets and switches when using metal measuring tools. While modern Australian electrical systems include safety switches, maintaining awareness of electrical hazards prevents accidents during measurement activities.
Digital Alternatives: Room Measurement Apps and Their Accuracy
Modern smartphone apps offer convenient alternatives to traditional measuring tools, though understanding their limitations ensures realistic expectations.
Apps like MagicPlan and RoomScan use your phone’s camera and sensors to create floor plans and measure spaces. These tools excel at creating quick sketches and providing approximate dimensions for initial planning. They work particularly well in standard rectangular rooms with clear wall boundaries.
However, app-based measurements typically achieve accuracy within 2-5 centimetres under ideal conditions. This margin of error can be significant when fitting furniture through doorways or planning tight spaces. Complex room shapes, poor lighting, or reflective surfaces further reduce accuracy.
Consider digital tools as supplementary to traditional measuring methods rather than replacements. Use apps for initial room surveys and rough planning, then verify critical measurements with physical tools before making furniture purchases. This hybrid approach combines convenience with the precision necessary for successful furniture selection.
The integration capabilities of some apps, such as MagicPlan’s compatibility with Floorplanner, allow you to transition seamlessly from measurement to furniture planning, making them valuable additions to your measurement toolkit when used appropriately.
Step 1: Measure Core Room Dimensions
Accurate room measurements form the foundation of successful furniture selection. Before considering any piece, you need precise dimensions of your space to ensure both proper fit and proportional balance.
Length and Width Measurements: Wall-to-Wall at Multiple Points
Measure your room’s length and width from wall to wall at several different points, not just once in the centre. Older Australian homes, particularly Federation and Victorian-era properties, often have walls that aren’t perfectly straight or parallel. Take measurements at both ends of each wall and in the middle to identify any variations.
Use a steel tape measure for accuracy, as fabric measures can stretch over time and provide inconsistent readings. Record all measurements, noting any discrepancies. A room that measures 4.2 metres at one end but 4.15 metres at the other will affect furniture placement along that wall.
Ceiling Height Measurements: Accounting for Variations and Slopes
Ceiling heights in Australian homes vary significantly, especially in older properties. Measure from finished floor level to ceiling at multiple points around the room. Many homes feature sloped ceilings, decorative cornicing, or bulkheads that reduce effective height in certain areas.
Pay particular attention to corners and areas near windows, where ceiling height often drops. This becomes crucial when positioning tall furniture like bookcases, wardrobes, or floor lamps. Document the lowest point in each area where you might place furniture.
Floor Level Considerations: Raised Areas, Steps, Different Flooring
Australian homes frequently feature level changes within rooms, particularly in renovated properties or open-plan designs. Identify any raised areas, steps, or transitions between different flooring materials. These variations affect furniture stability and visual flow.
Measure the height of any steps or raised platforms, and note their exact location relative to walls and doorways. A sunken lounge area or raised dining space will influence furniture selection and arrangement significantly.
Recording Measurements Accurately: Double-Checking and Notation Methods
Develop a systematic approach to recording measurements that prevents errors and confusion later. Create a simple sketch of your room and label each measurement clearly. Use consistent units throughout (metres and centimetres work best for furniture planning).
95% of furniture delivery problems stem from incorrect initial measurements, making double-checking essential for every dimension.
Verify each measurement by taking it twice, preferably from different directions. For example, measure room width from left to right, then right to left. Record both readings and investigate any discrepancies immediately. Use your smartphone to photograph your measurements as backup documentation.
Creating a Basic Room Sketch with Dimensions
Draw a simple floor plan showing your room’s shape with all measurements clearly marked. Include the location of doors, windows, and any architectural features like fireplaces or built-in storage. This sketch becomes your reference document throughout the furniture selection process.
Don’t worry about artistic quality – focus on accuracy and clarity. Label each wall with its measured length, mark ceiling heights in different areas, and note any level changes. This visual reference helps you understand spatial relationships and identify the best furniture placement options before you shop.
Step 2: Map the Complete Delivery Route
Before measuring your room dimensions, start by mapping the complete path your furniture will travel from street access to its final destination. This critical step prevents the frustration of discovering your perfect piece cannot physically reach the room, regardless of whether it fits once there.
Starting from Street Access: Front Door, Garage, or Service Entrance
Begin your route mapping at the point where delivery trucks can access your property. For most Australian homes, this means the front door, but consider alternative entry points that might offer better clearance. Garage doors often provide wider openings than standard front doors, while service entrances in apartment buildings may have different dimensional constraints than main lobbies.
Document the exact opening dimensions at your starting point, including any obstacles like security screen doors, storm doors, or architectural features that reduce the effective opening size. In older Australian homes, particularly Federation and Victorian-era properties, front doors can be surprisingly narrow compared to modern furniture dimensions.
Identifying Every Pathway: Hallways, Corridors, and Connecting Spaces
Walk the complete route from entry to destination, noting every corridor, hallway, and connecting space your furniture must navigate. Australian homes, especially older terraces and bungalows, often feature long, narrow hallways that can become bottlenecks for furniture delivery.
Measure corridor widths at their narrowest points, accounting for skirting boards, light switches, and any wall protrusions. Remember that hallway width requirements increase significantly for longer pieces, as delivery teams need space to manoeuvre and rotate furniture around corners.
Noting Potential Obstacles: Furniture, Fixtures, and Architectural Features
Identify and measure any permanent or semi-permanent obstacles along your delivery route. This includes existing furniture that cannot be easily moved, built-in fixtures, ceiling fans, pendant lights, and architectural features like columns or exposed beams.
Pay particular attention to overhead clearances, especially in areas with decorative ceiling features common in Australian period homes. Chandeliers, ceiling roses, and cornicing can all impact the ability to tilt tall furniture during transport.
Measuring Turning Points and Corners: 90-Degree Turns and Tight Spaces
Corner navigation presents the greatest challenge for furniture delivery. At each turning point, measure both the available space and the clearance required for your specific furniture dimensions. The length of hallway on each side of a corner must accommodate the furniture’s longest dimension to allow proper rotation.
For L-shaped or dog-leg hallways common in Australian homes, calculate the diagonal clearance needed when furniture must be tilted to navigate the turn. This often requires significantly more space than the furniture’s stated dimensions would suggest.
Planning Alternative Routes if Primary Path is Blocked
Always identify backup delivery routes before your furniture arrives. Consider whether pieces can be brought through rear entrances, sliding doors, or even windows if ground-floor access allows. Some delivery teams can disassemble and reassemble furniture if standard routes prove impossible.
For apartment dwellers, investigate service lifts, loading docks, or freight elevators that may accommodate larger pieces when passenger lifts cannot. Building management can often provide access to these alternatives with advance notice, potentially saving your delivery from failure.
Document your alternative routes with the same attention to detail as your primary path. Having this information ready ensures delivery teams can quickly pivot to Plan B without delays or additional charges for return visits.
Step 3: Measure All Doorways and Openings
Doorways represent the most critical measurement point in your furniture delivery path. Even the most perfectly sized piece becomes useless if it cannot pass through your home’s openings. Australian homes, particularly older Federation and inter-war properties, often feature narrower doorways than modern furniture is designed for.
Width Measurements: Inside Frame Dimensions
Measure the clear opening from the inside edge of one door frame to the other, not the door leaf width. This provides the actual usable space for furniture passage. Account for any protruding elements like door handles, hinges, or security chains that reduce the effective opening width.
In double-brick homes common across suburban Australia, door frames can be substantially deeper than expected. This depth affects your ability to angle furniture through the opening, as the frame creates a tunnel effect that limits diagonal maneuvering space.
Height Measurements: Floor to Frame Header
Measure from the finished floor level to the underside of the door frame header. Include any threshold strips or door seals in your floor measurement, as these can reduce clearance by several centimeters. Pre-war Australian homes, including Queenslanders and Federation terraces, often have lower ceiling and door heights than contemporary builds.
Consider the diagonal clearance required when tilting tall furniture. A 210cm bookcase requires approximately 297cm of diagonal space when tilted at 45 degrees, far exceeding its stated height dimension.
Frame Depth: Critical for Angled Maneuvering
Measure the depth of each door frame from the interior face to the exterior face. This measurement becomes crucial when furniture must be angled or tilted to navigate through openings. Deep frames in brick construction can significantly limit your maneuvering options during delivery.
The frame depth also affects how furniture sits once positioned. Pieces placed directly against walls with deep window or door frames may not align flush, creating gaps or preventing doors and drawers from opening fully.
Door Swing Direction and Clearance
Document which direction each door opens and ensure your furniture placement won’t interfere with the door’s full swing. This consideration extends beyond delivery day to daily functionality. Mark the door swing arc on your floor plan to visualize potential conflicts with furniture positioning.
Consider whether doors can be temporarily removed from their hinges if standard clearance proves insufficient. Many delivery teams can perform this service, but it requires advance planning and may incur additional charges.
Special Door Configurations
Double doors typically provide the widest opening but may have a center mullion that reduces usable width. Sliding doors offer excellent clearance but may require track removal for oversized pieces. French doors with their glass panels need careful handling during furniture passage to prevent damage.
Bi-fold doors can often be completely folded back to maximize opening width, while cavity sliding doors that disappear into wall pockets provide unobstructed access. Document these special configurations as they may offer solutions when standard doorways prove too restrictive.
Remember to measure any security screen doors separately, as these often have different dimensions from the main door and may need removal during delivery. The combined restrictions of both doors can significantly impact your furniture’s delivery route.
Step 4: Assess Hallways and Corridors
Hallways and corridors often present the most challenging obstacles in your furniture delivery route. These narrow passages require precise measurements and careful planning to ensure your furniture can navigate through without damage or getting stuck.
Measuring Narrowest Points: Accounting for Skirting Boards and Protrusions
Don’t measure hallway width at the widest point and assume that represents the entire corridor. Instead, identify and measure the narrowest section, which often determines whether your furniture will pass through successfully.
Account for all protrusions that reduce usable width. Skirting boards typically reduce corridor width by 3-5 centimeters on each side in Australian homes, particularly in older Federation and inter-war properties. Light switches, power outlets, and decorative architraves can further narrow the passage.
Measure from the inside face of one skirting board to the inside face of the opposite skirting board at multiple points along the hallway. Record the smallest measurement, as this will be your limiting dimension during furniture delivery.
Corridor Length Requirements: Space Needed for Furniture Rotation
Long furniture pieces require adequate corridor length to maneuver, particularly when navigating corners or tight turns. The general rule is that hallway length on each side of a corner should equal at least the longest dimension of your furniture piece.
For example, a 2.4-meter sofa needs approximately 2.4 meters of straight hallway before and after any 90-degree turn to allow proper rotation. Insufficient corridor length forces delivery teams to attempt complex angling maneuvers that increase the risk of wall damage and furniture scratches.
Measure the full length of each hallway segment, noting any interruptions like doorways, alcoves, or architectural features that might provide temporary maneuvering space during delivery.
Ceiling Height in Hallways: Clearance for Tilting Tall Items
Ceiling height becomes critical when furniture needs to be tilted to navigate narrow passages. A bookcase or wardrobe that fits through a doorway when upright may require tilting in a narrow hallway, dramatically increasing the vertical clearance needed.
Measure ceiling height at multiple points throughout the hallway, as older Australian homes often have uneven ceilings or bulkheads that reduce clearance. Pay particular attention to areas under staircases, where ceiling height typically decreases significantly.
Calculate diagonal clearance requirements for tall furniture pieces. A 2.1-meter tall cabinet tilted at 45 degrees requires approximately 2.97 meters of ceiling clearance. Factor in any ceiling fans, light fixtures, or decorative moldings that further reduce available space.
Light Switches and Outlets: Avoiding Blockages During Delivery
Light switches and power outlets protruding from hallway walls can catch furniture edges during delivery, causing damage to both the furniture and electrical fittings. Mark the location and projection distance of all electrical fixtures along your delivery route.
Standard Australian power outlets typically project 10-15 millimeters from the wall surface, while light switches may protrude slightly less. While these seem minimal, they can catch furniture corners or scratch surfaces during tight maneuvers.
Consider whether any switches or outlets can be temporarily removed or protected during delivery. Some delivery teams carry protective materials, but this requires advance planning and may incur additional charges.
Corner Navigation: Calculating Space Needed for 90-Degree Turns
Navigating corners represents one of the most complex challenges in furniture delivery. The space required depends on your furniture’s dimensions and the angle of the turn, with 90-degree corners being the most restrictive.
For successful corner navigation, measure both hallway segments meeting at the corner. The minimum corridor width should accommodate your furniture’s narrowest dimension, while corridor length should equal at least the furniture’s longest dimension on both sides of the turn.
Consider the turning radius required for your specific furniture piece. Rigid items like dining tables need more space than flexible items like mattresses. Long sofas may require a “pivot and slide” technique that demands precise measurements and experienced delivery personnel.
Document any architectural features at corners that might assist or hinder navigation, such as alcoves that provide temporary storage space or protruding columns that reduce turning clearance.
Step 5: Evaluate Staircases and Vertical Access
Staircases represent one of the most challenging obstacles in furniture delivery, particularly in multi-level Australian homes and apartment buildings. Understanding how to measure room for furniture includes evaluating every vertical pathway your pieces must navigate to reach their final destination.
Staircase Width: Handrail to Wall Measurements
Measure the clear width from the inside face of the handrail to the opposite wall surface. This usable width is often significantly narrower than the staircase appears, especially in older Australian homes where substantial timber handrails and balusters reduce clearance.
Account for any protruding elements like newel posts, decorative balusters, or handrail brackets that further restrict the passage. In Federation and Victorian-era homes common across Melbourne and Sydney, ornate staircase details can reduce effective width by 10-15 centimetres on each side.
Ceiling Clearance Above Stairs: Headroom for Angled Items
Measure the vertical clearance from each stair tread to the ceiling above, paying particular attention to areas where the ceiling slopes or drops. This measurement becomes critical when furniture needs to be tilted upright during the carry.
Dog-leg staircases and curved stairs present additional challenges, as the ceiling often drops significantly at the turn. Measure the lowest point of clearance along the entire staircase route, not just the highest sections.
Landing Dimensions: Space for Rotating and Repositioning Furniture
Landings serve as crucial pivot points where delivery teams rotate and reposition furniture during staircase navigation. Measure both the length and width of each landing, including any space restrictions created by doors, walls, or architectural features.
Small landings are particularly common in Australian terrace houses and older apartment buildings, where space was at a premium during construction. A landing that measures less than the furniture’s longest dimension may prevent successful navigation, regardless of staircase width.
Stair Angle and Rise: Impact on Furniture Tilting Requirements
Steep staircases require more aggressive tilting angles, which demands additional ceiling clearance and increases the risk of damage to both furniture and walls. Measure the rise and run of individual steps to calculate the overall staircase angle.
Australian building codes typically require a maximum rise of 190mm and minimum going of 250mm for residential stairs, but older homes may not comply with modern standards. Steeper stairs make furniture delivery significantly more challenging and may require professional rigging equipment.
Alternative Access: Service Stairs, External Stairs, or Crane Delivery
When primary staircases prove inadequate, investigate alternative delivery routes that may offer better access. Many Australian apartment buildings feature service stairs with wider clearances designed for maintenance and emergency access.
External fire stairs or back staircases often provide more generous dimensions than internal stairs. For ground-floor apartments or houses with suitable access, crane delivery through windows or balconies becomes a viable option, though this typically incurs substantial additional costs.
Document all potential access routes during your initial measurements, as delivery teams may need to switch strategies on the day if the primary route proves unworkable. Professional delivery services often conduct their own site inspections for high-value furniture, but having comprehensive measurements helps avoid costly delays and complications.
Step 6: Measure Elevator and Lift Access
Elevator access can make or break your furniture delivery in multi-story buildings across Australia’s major cities. Many residents in Sydney’s high-rise apartments or Melbourne’s converted warehouses discover too late that their new furniture won’t fit through the building’s lift system, leaving expensive pieces stranded in lobbies.
Elevator Door Dimensions: Width and Height of Opening
Measure the clear opening of elevator doors from inside edge to inside edge, not the door panels themselves. Standard passenger elevators in Australian apartment buildings typically range from 80-110cm wide, but older buildings may have significantly narrower openings. Record both the width and height of the opening, accounting for any door tracks or safety sensors that reduce usable space.
Centre-opening doors provide the full measured width for furniture passage, while side-opening doors reduce your effective width by the space occupied by the open door panel. Document the door operation type during your initial assessment, as this affects your delivery strategy.
Interior Cab Measurements: Length, Width, and Height
The elevator cab’s internal dimensions determine whether furniture can be rotated or tilted during transport. Measure the interior width, depth, and height at multiple points, as older lifts may have uneven dimensions due to wear or renovation modifications.
Pay particular attention to ceiling-mounted fixtures like lights or ventilation grilles that reduce effective height. Many Australian apartment buildings feature decorative ceiling panels or safety equipment that can catch tall furniture during loading.
Door Operation Type: Center-Opening vs Side-Opening Impact
The door mechanism significantly impacts your furniture delivery options. Centre-opening doors split apart to provide maximum clear width, while side-opening doors slide to one side, reducing usable width by approximately 15-20cm when fully open.
Side-opening doors also create challenges when loading long furniture, as one end must be angled into the cab while the door remains open. This requires coordination between delivery personnel and may necessitate holding the door override button during loading.
Weight Restrictions: Furniture Weight vs Elevator Capacity
Australian building codes require passenger elevators to display maximum weight capacity, typically ranging from 320kg to 1000kg depending on the building’s age and classification. However, furniture weight combined with delivery personnel can quickly approach these limits.
Solid timber dining tables, stone-top pieces, or large sectional sofas often exceed 150kg, requiring careful calculation when adding the weight of two delivery personnel (approximately 160kg combined). Always verify furniture specifications include packaging weight, which can add 20-30% to the total load.
Service Elevator Availability: Booking and Access Requirements
Service elevators in Australian apartment buildings typically offer larger dimensions and higher weight capacity than passenger lifts. These freight elevators are specifically designed for deliveries and removals, with reinforced floors and wider openings.
Contact building management at least 48 hours before delivery to book service elevator access. Many buildings require:
- Advance booking with specific time slots
- Security deposit for potential damage
- Protective padding installation
- Concierge or maintenance staff supervision
- Proof of insurance from delivery company
Service elevators may only operate during specific hours to avoid disrupting residents, typically between 9am-5pm on weekdays. Weekend access often requires additional fees and advance approval from body corporate or building management.
Step 7: Document Architectural Features and Obstacles
Once you’ve mapped your delivery route and measured the room’s basic dimensions, the next critical step when learning how to measure room for furniture is documenting every architectural feature that could affect furniture placement. These built-in elements and structural components often determine not just where furniture can go, but how it functions once it’s there.
Windows: Sill Height, Header Clearance, and Opening Mechanisms
Windows present multiple considerations when measuring your room for furniture. Start by measuring the sill height from the floor to the bottom of the window frame. This measurement determines whether low furniture like console tables or storage units can sit beneath the window without blocking natural light.
Header clearance is equally important for tall furniture pieces. Measure from the top of the window frame to the ceiling, noting any architectural details like cornicing or decorative mouldings that might reduce clearance. In older Australian homes, particularly Federation and Victorian-era properties, ornate window treatments and deep architraves can significantly impact furniture positioning.
Don’t overlook window opening mechanisms. Casement windows that swing inward need clearance space, while sliding windows may have tracks that protrude slightly from the wall. Double-hung sash windows in heritage homes often have thick sills that furniture must clear.
Built-in Features: Fireplaces, Bookcases, and Their Protrusion Distances
Built-in features add character to Australian homes but require careful measurement for successful furniture placement. Fireplaces, particularly common in Melbourne and Adelaide homes, need specific clearances for both safety and aesthetics. Measure the hearth depth, mantelpiece height, and overall width of the fireplace surround.
Record how far these features protrude from the wall surface. A traditional brick fireplace might extend 30-40 centimetres into the room, while modern gas fireplaces typically have minimal protrusion. Built-in bookcases, entertainment units, or display alcoves should be measured for width, height, and depth to ensure new furniture complements rather than competes with these permanent fixtures.
Heating and Cooling: Radiators, Vents, and Clearance Requirements
Climate control systems significantly impact furniture placement and require specific clearances for proper operation. In older Melbourne and Adelaide homes, hydronic radiators or panel heaters need at least 30 centimetres clearance on all sides for effective heat circulation. Measure the height, width, and depth of these units, plus their distance from walls and corners.
Air conditioning vents, both supply and return, must remain unobstructed. Floor vents need furniture positioned to allow airflow, while wall-mounted units require clearance above and below. Ducted systems with ceiling vents are less restrictive but still influence room layout, particularly for tall furniture pieces.
Split system indoor units, popular in Australian homes, typically need 15 centimetres clearance on sides and 30 centimetres below for optimal performance. Document these measurements to ensure your furniture arrangement doesn’t compromise heating and cooling efficiency.
Electrical Features: Outlets, Switches, and Their Positioning
Electrical outlets and switches are often overlooked when measuring room for furniture, yet they’re crucial for functionality. Australian homes typically have power outlets positioned 30 centimetres above floor level, though this varies in older properties. Measure the exact height and distance from corners for each outlet.
Light switches are usually positioned 120 centimetres from the floor and 15 centimetres from door frames. Document their locations to ensure furniture doesn’t block access. Consider the swing radius needed to operate switches comfortably, particularly important for bedside tables and living room furniture arrangements.
Television and data outlets require special attention in entertainment areas. These are often positioned at specific heights for wall-mounted TVs or entertainment units. Measure their exact position and note any cable management requirements that might influence furniture placement.
Structural Elements: Columns, Beams, and Immovable Obstacles
Structural elements are permanent fixtures that must be worked around when planning furniture layouts. Load-bearing columns in open-plan areas, common in modern Australian apartments and renovated homes, require careful measurement of their dimensions and positioning relative to walls and other features.
Exposed ceiling beams, popular in country-style and industrial-themed Australian homes, can limit the height of furniture in specific areas. Measure the beam height from the floor and note their spacing to determine where tall pieces can be positioned safely.
Other immovable obstacles might include staircase undersides, sloped ceilings in attic conversions, or architectural features like archways and niches. Each requires precise measurement to understand how they’ll interact with your planned furniture arrangement.
Document these measurements with sketches or photos, noting dimensions and relationships to other room features. This comprehensive approach to measuring room for furniture ensures your new pieces will not only fit physically but function optimally within your home’s unique architectural framework.
Understanding Furniture Dimensions and Specifications
When learning how to measure room for furniture, understanding manufacturer specifications becomes crucial for making informed purchasing decisions. Furniture dimensions can vary significantly between brands, and knowing how to interpret these measurements ensures your chosen pieces will fit perfectly in your space.
Standard Furniture Measurements: Width, Depth, Height Definitions
Furniture manufacturers typically provide three standard measurements that form the foundation of any purchase decision. Width refers to the side-to-side measurement when facing the piece, depth measures how far the furniture extends from the wall into the room, and height indicates the vertical measurement from floor to the highest point.
These measurements become particularly important in Australian homes where space efficiency matters. A dining table listed as 180cm wide, 90cm deep, and 75cm high gives you the exact footprint needed to plan your room layout. However, manufacturers may measure differently – some include protruding elements like handles or decorative features, while others measure only the main body of the piece.
Diagonal Measurements: Calculating for Delivery Through Tight Spaces
Diagonal measurements often determine whether furniture can navigate through doorways, hallways, and staircases during delivery. This calculation becomes essential when the furniture’s width or height exceeds your doorway dimensions but might fit when tilted at an angle.
For rectangular furniture like sofas or dining tables, calculate the diagonal by using the Pythagorean theorem: square the width, square the depth, add them together, then find the square root. A sofa measuring 220cm wide and 90cm deep has a diagonal of approximately 237cm. This diagonal measurement must fit within your doorway’s diagonal clearance to pass through when tilted.
Packaging Dimensions: Assembled vs Flat-Pack Delivery Considerations
Understanding packaging dimensions helps you plan delivery logistics more effectively. Assembled furniture arrives ready to use but requires sufficient clearance throughout the entire delivery route. These pieces typically match their listed dimensions, though protective packaging may add several centimetres to each measurement.
Flat-pack furniture, popular with retailers like IKEA, arrives in compact boxes that easily navigate tight spaces. However, you’ll need adequate assembly space once inside your home. A large wardrobe that ships in multiple flat boxes might require a 3-metre by 3-metre clear area for assembly, even though the finished piece only measures 180cm wide.
Modular Furniture: Measuring Individual Components vs Assembled Units
Modular furniture systems require careful consideration of both individual component dimensions and the final assembled configuration. Each module typically has its own measurements, but the overall assembled unit may be larger due to connection hardware or overlapping elements.
When measuring room for modular furniture, consider future expansion possibilities. A modular shelving system might start with three units measuring 80cm wide each, but you may want to add additional modules later. Plan your initial layout with potential growth in mind, ensuring adequate wall space and floor area for expansion.
Manufacturer Specifications: Understanding Dimension Variations and Tolerances
Furniture manufacturing involves tolerances that can affect final dimensions. Most quality manufacturers work within tolerances of plus or minus 1-2 centimetres, but budget furniture may have wider variations. These small differences can impact fit in tight spaces or when trying to match existing pieces.
Australian furniture standards require clear dimension labelling, but interpretation varies between manufacturers. Some measure only the furniture body, excluding cushions, handles, or decorative elements. Others include all protruding parts in their measurements. Always clarify with retailers whether dimensions include all elements that might affect your space planning.
When purchasing from international retailers, verify whether dimensions are listed in metric or imperial measurements. Converting between systems can introduce rounding errors that compound when planning room layouts. Always double-check conversions and consider requesting metric measurements directly from the manufacturer for precision.
Calculating Proper Furniture Spacing and Clearances
Understanding how to measure room for furniture goes beyond determining if pieces will fit through doorways. Proper spacing and clearances ensure your furniture arrangement creates a functional, comfortable, and safe living environment that meets both practical needs and building regulations.
Traffic Flow Requirements: Minimum Walkway Widths
Creating adequate traffic flow is essential for daily comfort and emergency safety. Main walkways through your room should maintain a minimum width of 90 centimetres, though 120 centimetres is preferable for high-traffic areas. Secondary pathways, such as routes around furniture groupings or to less frequently accessed areas, require at least 60 centimetres of clearance.
When measuring your room for furniture placement, map out natural traffic patterns between entrances, seating areas, and functional zones. Avoid creating furniture arrangements that force people to navigate around obstacles or squeeze through narrow gaps, as this disrupts the room’s flow and can create safety hazards.
Functional Clearances for Daily Use
Different furniture combinations require specific clearances to function properly. The distance between your sofa and coffee table should measure 40-50 centimetres, allowing comfortable reach without stretching while preventing the space from feeling cramped. This measurement accommodates leg room and provides adequate space for placing drinks, books, or remote controls.
Dining areas demand greater clearances due to chair movement. Allow 90-120 centimetres between your dining table edge and any wall or furniture behind it. This space accommodates pulling chairs out fully and allows people to walk behind seated diners comfortably. For rooms where multiple people may need to pass behind dining chairs simultaneously, increase this clearance to 135 centimetres.
Bedroom furniture requires thoughtful spacing around beds and storage pieces. Maintain 60 centimetres on each side of the bed for easy access and bed-making. Wardrobe doors need 90 centimetres of clear space in front to open fully, while chest of drawers require 75 centimetres for drawer operation and user access.
Door and Window Access Zones
When measuring room for furniture, preserve clear operation zones around doors and windows. Interior doors require their full swing radius to remain unobstructed, typically 90-100 centimetres from the door hinge. Sliding doors need their entire track length kept clear of furniture or obstacles.
Windows present unique considerations for furniture placement. Maintain at least 30 centimetres clearance from window sills to allow for opening, cleaning, and curtain or blind operation. Tall furniture pieces should not block more than one-third of a window’s height to preserve natural light and ventilation. Consider the swing radius of casement windows when positioning nearby furniture.
Safety Clearances and Building Code Compliance
Australian building codes mandate specific clearances for emergency egress and general safety. Hallways in residential properties must maintain minimum widths, and exit paths cannot be obstructed by furniture placement. Ensure your furniture arrangement doesn’t create dead ends or block alternative exit routes during emergencies.
Electrical safety requires maintaining clearances around power outlets, switches, and electrical panels. Furniture should not obstruct access to circuit breakers or prevent safe operation of electrical components. Similarly, heating and cooling vents need adequate clearance for proper air circulation and system efficiency.
Comfort Zones and Ergonomic Considerations
Beyond minimum clearances, consider comfort zones that enhance daily living. Seating arrangements benefit from intimate conversation distances of 180-240 centimetres between facing chairs or sofas. This range allows comfortable conversation without shouting while maintaining personal space boundaries.
Work areas require specific ergonomic clearances for productivity and health. Desk chairs need 120 centimetres behind them for pulling out and standing up comfortably. Computer workstations should maintain 60-90 centimetres from screen to user for optimal viewing distance and eye health.
Television viewing follows the general rule of sitting 1.5 to 2.5 times the screen’s diagonal measurement away from the display. For a 55-inch television, optimal viewing distance ranges from 2.1 to 3.5 metres. Factor this measurement when positioning seating relative to entertainment units during your room planning process.
Room Proportion and Scale Guidelines
Understanding how to measure room for furniture goes beyond basic dimensions – it requires mastering proportion and scale relationships that create visually balanced, functional spaces. These guidelines help ensure your furniture choices complement rather than overwhelm your room’s natural proportions.
The 2/3 Rule for Furniture Placement
The 2/3 rule serves as a fundamental principle when determining furniture length relative to wall length. Your primary furniture piece, such as a sofa or dining table, should measure approximately two-thirds the length of the wall it sits against. For a 4.5-metre wall, this translates to a sofa measuring around 3 metres in length.
This proportion creates visual harmony while leaving adequate space for side tables, floor lamps, or decorative elements. The remaining one-third provides breathing room that prevents the furniture from appearing cramped against the wall while maintaining proper scale relationships throughout the room.
Visual Weight Balance in Different Room Sizes
Visual weight balance becomes critical when avoiding overwhelming small spaces with oversized furniture. Heavy, dark-coloured pieces create more visual weight than lighter, streamlined alternatives, even when physical dimensions remain similar. A bulky leather sectional will dominate a compact living room, while a sleek fabric sofa in neutral tones maintains better proportion.
Consider furniture profiles and materials when assessing visual weight. Low-profile pieces with exposed legs create an airy feeling, while solid bases appear heavier. Glass and acrylic furniture virtually disappear, making them excellent choices for maintaining visual lightness in constrained spaces.
Ceiling Height Considerations
Ceiling height dramatically influences furniture scale decisions, particularly when placing tall furniture in low-ceiling rooms. Standard Australian ceiling heights range from 2.4 metres in older homes to 2.7 metres in contemporary builds, with some heritage properties featuring even lower ceilings.
Tall bookcases, wardrobes, or entertainment units can make low-ceiling rooms feel cramped and cave-like. Instead, choose horizontal furniture arrangements that emphasise width rather than height. In rooms with 2.4-metre ceilings, limit tall furniture to maximum 1.8-metre heights, leaving 60 centimetres of visual breathing space above.
Room Size Categories and Furniture Scale
Room dimensions determine appropriate furniture scale through three distinct categories that guide selection decisions. Understanding these categories helps match furniture proportions to space constraints effectively.
Small rooms (under 15 square metres) require carefully scaled furniture to maintain functionality without overwhelming the space. Choose multi-functional pieces like storage ottomans, nesting tables, or sofa beds. Avoid oversized sectionals or bulky dining sets that consume floor space needed for movement.
Medium rooms (15-25 square metres) offer flexibility for standard-sized furniture while allowing creative arrangements. These spaces accommodate three-seater sofas, six-person dining tables, or king-size beds with adequate clearance for daily activities.
Large rooms (over 25 square metres) can handle substantial furniture pieces and multiple seating areas. However, avoid the common mistake of pushing all furniture against walls, which creates a bowling alley effect. Instead, create intimate conversation groupings that anchor different zones within the larger space.
Matching Furniture Scale to Room Dimensions
Proportionate pieces for room dimensions require careful consideration of both individual furniture sizes and their relationships to each other. A dining table that fits perfectly in terms of length and width might still appear wrong if the chair height creates poor proportional relationships.
Consider the cumulative effect of all furniture pieces within the room. Multiple small-scale items can create visual clutter, while a few well-proportioned larger pieces often create more serene, spacious feelings. Balance delicate occasional tables with substantial seating, or pair sleek modern pieces with one statement furniture item that anchors the arrangement.
Remember that proper scale extends beyond furniture to include artwork, lighting fixtures, and decorative accessories. A tiny pendant light over a large dining table appears as inappropriate as an oversized chandelier in a compact breakfast nook. Maintain proportional consistency throughout all room elements for cohesive, well-designed results.
Creating Accurate Floor Plans and Layouts
Once you’ve measured your room dimensions and furniture requirements, translating these measurements into accurate floor plans becomes essential for visualising your space and making informed purchasing decisions. Creating detailed layouts helps prevent costly mistakes and ensures your furniture arrangement will work both functionally and aesthetically.
Hand-drawn Plans Using Graph Paper and Architectural Scales
Traditional hand-drawn floor plans remain one of the most reliable methods for room planning. Start with graph paper where each square represents a specific measurement – typically 1 square equals 10 centimetres works well for most Australian rooms. Use a sharp pencil to sketch your room’s outline, marking wall lengths, doorways, and windows with precise measurements.
Architectural scales provide professional accuracy when drawing furniture to scale. A 1:50 scale (where 1 centimetre on paper equals 50 centimetres in reality) suits most residential rooms. Mark your existing fixtures first – built-in wardrobes, air conditioning units, power outlets, and light switches. These permanent features will influence your furniture placement options significantly.
Digital Floor Plan Tools: Free and Paid Software Options
Digital planning tools offer flexibility and precision that hand-drawn plans cannot match. Free options like Floorplanner and RoomSketcher provide intuitive drag-and-drop interfaces with extensive furniture libraries. These platforms allow you to input your exact room measurements and experiment with different layouts instantly.
Professional software like SketchUp or AutoCAD offers advanced features for complex layouts but requires steeper learning curves. For most homeowners, mid-range options like Sweet Home 3D or Home Designer provide excellent balance between functionality and ease of use. These programs often include Australian standard furniture dimensions, making them particularly relevant for local planning needs.
Room Planning Apps: IKEA Kreativ, Floorplanner, RoomSketcher Features
Modern room planning apps have revolutionised how we visualise furniture arrangements. IKEA Kreativ uses augmented reality to place virtual furniture directly in your actual room through your smartphone camera. This technology helps you understand scale relationships and spatial impact before purchasing.
Floorplanner excels in creating detailed 2D floor plans with professional-quality output. The platform includes comprehensive measurement tools and generates shopping lists based on your selected furniture pieces. RoomSketcher offers both 2D planning and 3D visualisation, allowing you to walk through your virtual room and experience the layout from different angles.
These apps typically sync across devices, enabling you to start planning on your tablet while measuring, then refine details on your computer later. Many integrate with major Australian furniture retailers, showing real products with accurate dimensions and current pricing.
3D Visualisation: Understanding Spatial Relationships
Three-dimensional visualisation transforms flat floor plans into immersive experiences that reveal spatial relationships invisible in 2D drawings. Virtual walkthroughs help identify potential issues like blocked pathways, awkward furniture angles, or insufficient clearance around opening doors and drawers.
3D rendering shows how ceiling height affects room proportions and helps evaluate whether tall bookcases or entertainment units will overwhelm your space. Lighting simulation features demonstrate how natural light from windows interacts with furniture placement throughout different times of day.
Advanced 3D tools allow you to experiment with different colour schemes, materials, and finishes before committing to purchases. This capability proves especially valuable when coordinating multiple furniture pieces or planning room renovations alongside new furniture acquisitions.
Template and Furniture Libraries: Standard Furniture Dimensions
Comprehensive furniture libraries within planning software eliminate guesswork about standard dimensions. Australian furniture typically follows different sizing conventions than international pieces, particularly for items like dining tables, sofas, and bedroom furniture designed for our climate and lifestyle preferences.
Template libraries include common furniture configurations with accurate clearance requirements. A standard three-seater sofa template shows not just the sofa footprint but also the space needed for coffee table placement and walking paths. Dining table templates indicate chair clearance when pulled out for seating.
Many planning tools allow you to customise template dimensions to match specific furniture pieces you’re considering. This feature proves invaluable when comparing different brands or models, helping you understand how a 2.8-metre sectional from one manufacturer might fit differently than a similar-sized piece from another brand due to arm width or back depth variations.
Testing Furniture Fit Before Purchase
Before committing to any furniture purchase, testing how pieces will fit in your space prevents costly mistakes and delivery disappointments. Australian homes, with their diverse architectural styles from Federation terraces to modern apartments, require careful planning to ensure furniture fits both physically and proportionally.
Painter's Tape Method: Outlining Furniture Footprints
The painter’s tape method provides an immediate visual representation of how furniture will occupy your floor space. Use quality painter’s tape to outline the exact dimensions of each piece directly on your floor, creating full-scale templates that show the true footprint.
This technique proves particularly valuable for large pieces like sectional sofas or dining tables. Walk around the taped outlines to experience how the furniture affects traffic flow and room navigation. Consider how doors open, where people naturally walk, and whether the proportions feel comfortable rather than overwhelming.
Leave the tape in place for several days to test different scenarios. Try placing existing furniture around the outlined pieces, and have family members walk through the space during normal daily activities. This real-world testing reveals potential issues that measurements alone might miss.
Cardboard Mockups: Creating Full-Size Furniture Templates
Cardboard mockups take visualization one step further by creating three-dimensional representations of your intended furniture. Large cardboard sheets or moving boxes can be cut and assembled to match the height, width, and depth of specific pieces you’re considering.
This method works exceptionally well for testing tall furniture like bookcases, entertainment units, or wardrobes. Stack boxes to approximate height and observe how the piece interacts with ceiling height, windows, and other room features. For seating, create basic shapes that allow you to sit and test comfort zones with coffee tables or side tables.
Cardboard mockups also help test furniture arrangements and groupings. Create templates for multiple pieces simultaneously to experiment with different room layouts and conversation areas before making any purchases.
Digital Visualization: AR Apps and Virtual Room Staging
Modern augmented reality applications transform smartphones into powerful room planning tools. Apps like IKEA Place, Houzz, or manufacturer-specific tools allow you to virtually place furniture in your actual space using your phone’s camera.
These applications provide realistic scale representation and let you test different finishes, colours, and configurations instantly. Many Australian furniture retailers now offer AR visualization tools that showcase their specific products in your room, helping you see exactly how pieces will look before ordering.
Virtual room staging software takes this concept further, allowing you to upload room photos and digitally furnish entire spaces. This approach helps coordinate multiple furniture pieces and ensures cohesive design schemes while testing various layout options efficiently.
Measurement Verification: Double-Checking Critical Dimensions
Critical measurements require verification at multiple points throughout the planning process. Re-measure doorways, hallways, and room dimensions at least twice, preferably with different people handling the tape measure to catch any errors.
Pay special attention to delivery route measurements, including the path from your front door to the room where furniture will be placed. Australian homes often feature narrow hallways, tight corners, or staircases that can prevent furniture delivery even when the destination room has adequate space.
Document all measurements with photos showing the tape measure in position. This visual record helps when discussing options with furniture sales staff and provides reference material when comparing different pieces or brands.
Professional Consultation: When to Seek Interior Design Advice
Complex room layouts, expensive furniture purchases, or complete room makeovers often benefit from professional interior design consultation. Many Australian furniture retailers offer complimentary design services that include space planning and furniture selection guidance.
Professional designers bring expertise in proportion, scale, and traffic flow that prevents common mistakes. They can identify potential issues with furniture placement, suggest alternative arrangements, and help coordinate multiple pieces for cohesive room design.
Consider professional consultation when dealing with challenging spaces like open-plan living areas, rooms with unusual proportions, or when coordinating furniture across multiple connected spaces. The investment in design advice often saves money by preventing purchasing mistakes and ensures optimal use of your available space.
Common Measurement Mistakes and How to Avoid Them
Even with the best intentions, several measurement errors can turn furniture shopping into an expensive mistake. Understanding these common pitfalls helps ensure your new pieces arrive safely and fit perfectly in your Australian home.
Forgetting the Delivery Route
Many homeowners focus exclusively on whether furniture fits in the final room, completely overlooking the journey from front door to destination. This oversight causes delivery disasters across Australia, particularly in older homes with narrow hallways and tight corners.
Start your measurements at the street entrance and work systematically through every doorway, corridor, and staircase your furniture must navigate. In Federation terraces and Queenslanders, hallways often narrow considerably from their widest point, creating bottlenecks that stop deliveries cold.
Ignoring Door Swing Patterns
Door operation creates invisible boundaries that furniture must respect. A perfectly sized piece becomes problematic when positioned where it blocks doors from opening fully or interferes with natural traffic patterns.
Mark door swing arcs on your floor plan or use painter’s tape to outline the full range of movement. Consider both interior doors and wardrobes, as these functional clearances determine furniture placement more than room dimensions alone.
Overlooking Diagonal Measurements
Tall furniture often requires angled maneuvering through doorways, creating diagonal dimensions that exceed the piece’s stated height or width. Bookcases, wardrobes, and entertainment units frequently get stuck because their diagonal measurements weren’t calculated.
For any piece taller than your doorway height, calculate the diagonal measurement from bottom front corner to top back corner. This diagonal must fit through your doorway width with room for maneuvering. Professional delivery teams rely on these calculations to determine feasibility before attempting delivery.
Assuming Standard Dimensions
Australian homes built before 1980 often feature non-standard dimensions that catch furniture buyers off guard. Door heights, ceiling clearances, and hallway widths vary significantly from modern building standards, particularly in heritage areas across Sydney, Melbourne, and Adelaide.
Never assume measurements based on visual estimates or “standard” dimensions. Victorian terraces might have 2.1-meter door heights where modern homes feature 2.4 meters. Post-war bungalows often include narrow service hallways that modern furniture wasn’t designed to navigate.
Not Accounting for Packaging
Furniture arrives wrapped in protective packaging that adds significant bulk to actual dimensions. Sofas gain 10-15 centimeters in every direction when properly packaged, while dining tables may include removable legs that extend packaging length considerably.
Contact retailers about packaging dimensions before delivery day, especially for tight access situations. Many Australian furniture stores can provide “packaging removed” measurements and may offer unpacking services in lobbies or driveways for difficult deliveries.
Professional Delivery Tip
Avoiding these measurement mistakes transforms furniture shopping from stressful guesswork into confident decision-making. Take time to measure comprehensively, document everything with photos, and verify packaging dimensions with retailers. Your future self will thank you when delivery day proceeds smoothly and your new furniture settles perfectly into its intended space.
Special Considerations for Australian Homes
Australian homes present unique challenges when measuring for furniture that differ significantly from international standards. Understanding these architectural characteristics ensures accurate measurements and prevents costly delivery disasters.
Federation and Inter-War Homes: Narrow Doorways and Low Ceilings
Federation houses (1890-1915) and inter-war bungalows (1915-1940) across Sydney, Melbourne, and Adelaide feature distinctly smaller dimensions than modern construction. Door openings typically measure 2.0-2.1 metres in height compared to today’s 2.4-metre standard, while doorway widths often sit at 75-80 centimetres rather than the contemporary 90 centimetres.
Ceiling heights in these heritage homes range from 2.7-3.0 metres in main rooms, dropping to as low as 2.4 metres in service areas and bedrooms. When measuring room for furniture in Federation terraces, pay particular attention to hallway dimensions, which were designed for foot traffic rather than furniture delivery. Many feature long, narrow corridors that create bottlenecks for modern sofas and dining tables.
Queenslander Architecture: High-Set Homes and Stair Access
Queensland’s iconic high-set homes present unique furniture delivery challenges that require careful measurement planning. External staircases leading to raised living areas typically measure 90-120 centimetres wide, with ceiling clearance varying dramatically depending on the home’s elevation and stair design.
The traditional Queenslander veranda creates additional measurement considerations. Wide wraparound verandas may offer alternative delivery routes, but their floor heights and ceiling clearances differ from internal spaces. When measuring room for furniture in these homes, document both internal room dimensions and external access routes, including veranda ceiling heights and door openings from outdoor spaces.
Modern Apartments: Elevator Restrictions and Building Access
High-rise living in Australian cities introduces complex measurement requirements beyond the apartment itself. Standard passenger elevators in buildings constructed before 2000 often measure 1.1 metres wide by 2.1 metres deep, while newer developments feature larger 1.4 metre by 2.4 metre dimensions.
Service elevators, where available, typically offer 1.8-2.0 metre widths and 2.5-3.0 metre depths, but require advance booking and may have weight restrictions. Building management companies across Melbourne, Sydney, and Brisbane often mandate specific delivery windows and may charge fees for service elevator access. Factor these logistics into your furniture measurement planning, as alternative routes through fire stairs rarely accommodate large pieces.
Double-Brick Construction: Deep Door Frames and Window Reveals
Double-brick construction, prevalent in Australian suburban homes built between 1950-1990, creates door frames 20-30 centimetres deep. This depth significantly impacts furniture delivery, as it reduces the effective diagonal clearance when tilting large pieces through doorways.
Window reveals in double-brick homes extend 15-25 centimetres from the internal wall surface, affecting furniture placement near windows. When measuring room for furniture placement, account for these deep reveals when positioning sofas, dining tables, or entertainment units adjacent to windows. The reveals also impact natural light flow and may influence your furniture arrangement decisions.
Climate Considerations: Expansion Gaps and Seasonal Variations
Australia’s diverse climate zones create measurement considerations often overlooked in furniture planning. Timber floors in homes across Queensland, New South Wales, and Western Australia expand and contract seasonally, potentially affecting door clearances by 5-10 millimetres throughout the year.
In tropical and subtropical regions, high humidity can cause timber door frames to swell, reducing clearance widths during summer months. Conversely, dry winter conditions in southern states may increase clearances slightly. Professional furniture delivery teams account for these variations, but when measuring room for furniture yourself, consider seasonal timing and allow extra clearance margins during high-humidity periods.
Metal door frames and window frames expand in extreme heat, particularly relevant in Darwin, Perth, and inland areas where temperatures exceed 40 degrees Celsius. Schedule furniture deliveries during cooler parts of the day when possible, and verify measurements taken during extreme weather conditions before finalizing purchases.
When Furniture Doesn't Fit: Solutions and Alternatives
Even with careful measurement, situations arise where furniture doesn’t fit as expected. Understanding your options before delivery day can save significant time, money, and stress when navigating tight spaces or unexpected obstacles.
Modular and Flat-Pack Options: Assembling Inside the Room
Modular furniture systems offer the most flexible solution for challenging delivery routes. Major Australian retailers like IKEA, Fantastic Furniture, and Bunnings stock extensive flat-pack ranges designed specifically for tight spaces and narrow doorways. These systems break down into components small enough to navigate standard doorways, then assemble to full-size furniture inside the destination room.
Sectional sofas represent the premium modular option, with individual sections typically measuring 80-90 centimetres wide. Each section passes through standard Australian doorways independently, then connects using hidden brackets or clips. Similarly, modular wardrobes, entertainment units, and dining sets can be transported as manageable pieces and assembled on-site.
When measuring room for furniture using modular systems, focus on the assembled dimensions rather than individual components. Verify that connecting hardware and assembly space requirements are factored into your room layout, as some systems require additional clearance during assembly.
Professional Disassembly: Removing Doors, Legs, or Components
Professional furniture delivery teams across Australia routinely disassemble pieces to navigate challenging spaces. Most quality furniture manufacturers design products with removable components specifically for this purpose. Dining table legs, sofa feet, wardrobe doors, and bed frames can often be detached without compromising structural integrity.
Sofa arms frequently unscrew or unclip, reducing width by 15-20 centimetres per side. Table leaves remove entirely, and many bed frames separate into head, foot, and side rail components. Professional teams carry the necessary tools and expertise to safely disassemble and reassemble furniture, typically adding 30-60 minutes to standard delivery timeframes.
Contact your retailer before delivery to discuss disassembly options. Most established furniture stores include this service at no additional charge, while some specialty or custom pieces may incur modest fees for complex disassembly work.
Alternative Delivery Methods: Crane Access or Window Delivery
When traditional delivery routes prove impossible, alternative access methods become necessary. Crane delivery through windows or balconies is available in major Australian cities, particularly for high-rise apartments in Sydney, Melbourne, and Brisbane CBD areas. This specialized service typically costs between $300-800 depending on height, access complexity, and furniture size.
Ground-floor window delivery offers a more affordable alternative for homes with accessible windows. Delivery teams can remove window sashes temporarily, creating openings large enough for substantial furniture pieces. This method works particularly well for older Australian homes where window openings often exceed doorway dimensions.
Balcony hoisting represents another specialized option for apartment dwellers. Professional teams use pulley systems and safety equipment to lift furniture to upper-level balconies, bypassing narrow stairwells and lift limitations entirely. Building management approval is typically required for these methods, so arrange permissions well in advance of delivery dates.
Furniture Modification: Custom Sizing or Adjustable Components
Custom furniture modifications provide permanent solutions for challenging spaces. Many Australian furniture manufacturers offer bespoke sizing services, creating pieces specifically dimensioned for your room and delivery route. While custom work typically adds 4-8 weeks to delivery timeframes, it ensures perfect fit and eliminates delivery complications.
Adjustable furniture systems offer compromise solutions between standard and fully custom pieces. Height-adjustable tables, expandable dining sets, and modular storage systems adapt to space constraints while maintaining functionality. These systems often cost 20-30% more than fixed equivalents but provide long-term flexibility as living situations change.
Professional furniture modification services can also retrofit existing pieces. Experienced craftspeople can shorten table legs, modify wardrobe depths, or adjust sofa dimensions to suit specific requirements. This approach works particularly well for inherited or antique pieces where replacement isn’t desirable.
Return and Exchange Policies: Understanding Retailer Terms
Understanding retailer return policies before purchase provides essential protection when furniture doesn’t fit as expected. Australian Consumer Law requires retailers to accept returns for goods that don’t match descriptions, but size-related issues often fall outside these protections unless specific guarantees were provided.
Australian Consumer Protection
Many Australian furniture retailers offer “fit guarantee” services, where delivery teams assess access routes before confirming orders. Harvey Norman, Nick Scali, and Freedom Furniture provide these assessments for complex deliveries, though policies and fees vary between retailers.
Restocking fees typically apply to returned furniture, ranging from 15-25% of purchase price. Custom or special-order pieces often cannot be returned unless defective. When measuring room for furniture, document your process thoroughly – photos and measurements can support return claims if delivery issues arise despite careful planning.
Some retailers offer “try before you buy” programs, particularly for premium furniture lines. These services allow temporary placement to verify fit and function before final purchase commitment, though availability is limited and typically requires substantial deposits.
Frequently Asked Questions
How do you measure a room for furniture?
Start by measuring the delivery route from street access through every doorway and hallway to your room. Then measure room dimensions (length, width, ceiling height) at multiple points to account for irregularities. Document all doorway openings including width, height, and frame depth. Use a steel tape measure for accuracy and record measurements of architectural features like windows, built-ins, and electrical outlets.
What is the 2/3 rule for a living room?
The 2/3 rule states that furniture length should be roughly two-thirds the length of the wall it sits against. For example, a 4.5-metre wall suits a sofa around 3 metres long. This proportion ensures the furniture looks balanced and doesn’t overwhelm or underwhelm the space.
What tools do I need to measure room for furniture?
Essential tools include a steel tape measure (at least 5 metres), pencil and paper for recording measurements, smartphone camera for reference photos, and painter’s tape for testing furniture footprints. Laser measures offer higher precision for longer spans and ceiling heights. Graph paper helps create proportional sketches for visualising furniture placement.
How much clearance should I allow between furniture pieces?
Allow 40-50cm between sofas and coffee tables for comfortable reach. Dining chairs need 90cm pullout space from the table to the wall. Main walkways require 90cm minimum clearance, while secondary pathways need 60cm. These clearances ensure comfortable movement and proper functionality in your space.
Why should I measure the delivery route before the room?
Many furniture delivery failures occur because pieces can’t navigate doorways, hallways, or staircases, not because they don’t fit the final space. Australian homes, particularly Federation terraces and double-brick construction, often have narrow doorways and deep door frames that can prevent furniture delivery even when the room dimensions are adequate.
How do I measure doorways for furniture delivery?
Measure doorway width from inside edge to inside edge of the frame, not the door itself. Record the height from floor to frame top and note the frame depth, especially important in double-brick Australian homes where frames can be 20-30cm deep. Account for door handles, hinges, or security chains that reduce usable width.
What are the challenges of measuring furniture for Australian homes?
Australian homes present unique challenges including narrow doorways in Federation and inter-war homes, deep door frames in double-brick construction, elevator restrictions in apartment buildings, and varying ceiling heights in period properties. Pre-war Queenslanders and bungalows often have lower ceiling heights than modern builds.
How accurate are room measurement apps?
Room measurement apps like MagicPlan achieve accuracy within 2-5 centimetres under ideal conditions. While convenient for initial planning and creating quick sketches, this margin of error can be significant when fitting furniture through tight spaces. They work best in standard rectangular rooms with clear wall boundaries.
How do I measure ceiling heights for tall furniture?
Measure from finished floor level to ceiling at the exact point where furniture will stand, as ceilings in older Australian homes often slope toward walls. Australian building standards require 2.4 metres minimum ceiling height, but period homes often feature higher ceilings. Use a step ladder for safety and check for ceiling fans, pendant lights, or exposed beams.
What should I do if furniture needs to be tilted through doorways?
When tilting furniture diagonally through doorways, ensure adequate ceiling clearance. A 210cm bookcase requires approximately 297cm of diagonal space at 45 degrees, needing close to 3 metres of ceiling height. Measure hallway length on both sides of corners – it should be at least as long as the furniture’s longest dimension for successful rotation.
How do I test furniture placement before buying?
Use painter’s tape to outline furniture footprints on your floor before purchasing. This technique allows you to walk through the space, assess traffic flow, and visualise how different arrangements will function in daily use. Take photos of the taped outlines for reference when shopping for furniture weeks later.
What measurements do I need for apartment furniture delivery?
For apartments, measure elevator door width and height, interior cab dimensions, and whether doors are centre-opening (full width) or side-opening (reduced width). Check stairwell width and headroom, landing dimensions, and building access restrictions. Ask about service lifts which are typically larger than passenger elevators and may require advance booking.
You May Also Like

Are Used European Cars Reliable in Australia? 2026 Guide